Automatically Backing Up Your PC Daily, Part 2 of 2
July 18, 2007 Posted by Tyler CruzThe following is a continuation on yesterday’s post:
After exhausting a plethora of backup solutions, I finally found a scalable alternative to a RAID setup. Basically put, I have a second hard drive, and every day data from my first hard drive is automatically backed up onto the second. Best of all, it’s done as a background process so it doesn’t affect whatever I’m doing.
After buying some more RAM yesterday (I had to replace the 1 Gig that broke during my computer crash earlier this month, plus 512 more to make it an even 3 gigs) I bought another hard drive as well. Since I wasn’t going to use a RAID set-up, the harddrives did not have to match – I therefore bought the smallest one they had. After paying $80 for the 80 GB drive, I drove home to install it.
Prior to purchasing it I had asked the guy if installing the hard drive was something I’d be able to do (I didn’t want to have to give up my computer for 2-3 days) and he said it was and gave me a quick 30-second lesson on how to install it. However, when I got home, I found that the back of my existing hard drive did not match the back of the new one. It turned out to be because he sold me an IDE drive when my existing one was SATA. This was easily resolved after another quick trip to the computer shop resulted in a free IDE cable.
After physically installing the memory and second hard drive and connecting the IDE cable to the motherboard and the hard drive, I turned my computer on to view my results. But I couldn’t see it. After a visit to #computerhelp on Undernet on IRC, my suspicion was correct – I hadn’t connected the power to the harddrive! D’oh!
After surgically opening my computer again, I saw the 4-pronged connector on the hard drive that had to be the power (all the other devices had that same 4-pronged connector and the wires all routed back to the power supply) and found a ‘spare’ plug hanging down and plugged it in – which fit only after a lot of careful and subtle adjusting of the power supply cord to make it reach.
I booted up my computer again and Windows had detected a new hardware install. I still couldn’t view the new drive in Windows Explorer, but knew why. I first had to format and partition the drive. To do this, I went to Control Panel -> Administrative Tools -> Computer Management -> Disk Management. From there you can activate and then partition the drive. It took around 30-minutes to partition my 80 GB drive, but fortunately Windows does this as a background process and you can continue to use the computer.
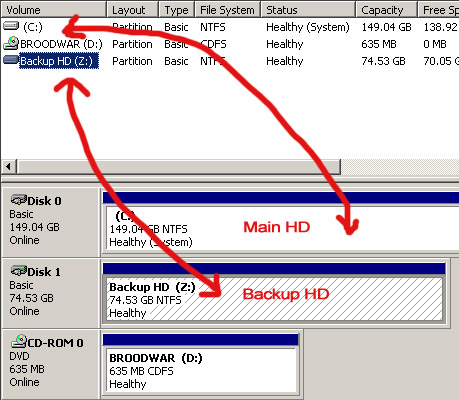
I set my secondary hard drive as Z: and named it “Backup HD”. After the partitioning was done, I was able to use it just fine – I had tested moving files back and forth to it. Success! I was happy, because I really know next to nothing when it comes to computers, and it was my first time installing a hard drive – the only other things I’ve installed have been memory and video cards.
Anyhow, with my backup hard drive (Z:) up and running, it was time to set up the automated backup system.
I’m using a backup tool called NTBACKUP, coupled with Window’s Task Scheduler. Fortunately both of these programs are completely free and ship with Windows XP. However, in Windows XP Home Edition, this tool has to be installed manually from the CD-ROM, whereas in Windows XP Professional, this tool is installed by default.
I have the home edition, so I had to go to D:\VALUEADD\MSFT\NTBACKUP\Ntbackup.msi on the Windows XP Home Edition CD: (D:\ refers to the CD-ROM drive-letter). [Note: Usually, OEMs such as Compaq, DELL won’t ship the Windows XP CD nor they include the NTBACKUP utility by default. You can download a copy of NTBACKUP.MSI at http://www.winxptutor.com/ntbackup.htm.]
To run NTBACKUP, simply go to Start -> Run -> and type in “NTBACKUP”. You should also be able to access it by going to Start -> Programs -> Accessories -> System Tools -> Backup. The setup process is very self explanatory, and you should have your backup system up and running in no time.
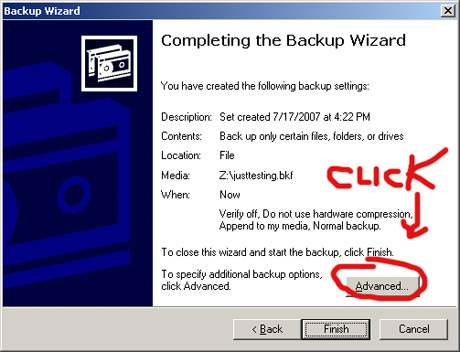
However, there are a few important steps you need to be sure not to miss. First, after completing the backup wizard, be sure to click on Advanced so that you can schedule when it should run.
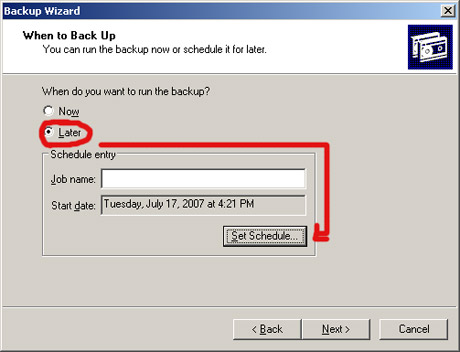
After a couple screens it should ask you when you want it to run. Even if you want to run your first backup now, select Later as it’s the only time the wizard will let you schedule it. Then select Set Schedule.
Window’s Task Scheduler is very powerful and will let you choose almost any schedule you would like. You can choose to have your backups done daily, weekly, monthly, or on a certain date. You can even set it to run whenever you turn your computer on, or whenever your computer has been idle for 37-minutes.
I have mine set to run whenever I turn my computer on, but may change it to run every morning at 9:00am since my computer is on most of the time. I set it to run whenever my computer turned on because I didn’t want a dialog box popping up and the backup procedure halting whatever I was doing at the moment. But to my surprise, the procedure runs as a backup process, meaning that you see nothing, and it uses ‘secondary’ resources to run, allowing you to continue using the computer without noticing anything has happened. Because of this I might change the backups to run daily.
Continuing on, an extremely important thing to note is that when you’re setting up the scheduler, that your password CANNOT be blank:
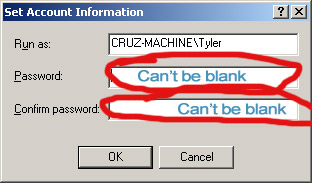
I was stumped after many attempts of setting up the scheduler because it never ran – the Status always read “Could not start”. After a quick Google search, I found out the following:
“A password is required for any Scheduled Task. If your user account does not have a password, Windows will not allow it to run a Scheduled Task.
This behavior can occur if the user account you used when you created the task has a blank (null) password. When you add a scheduled task to your Windows XP-based computer, you must provide a user name and password for the task. If you are using a local user account, the user password cannot be blank.
To resolve this behavior, create a password for the appropriate user account, and then reschedule the task and provide the new password when you are prompted for it.”
This was indeed the issue – my user account on Windows does not have a password, which is why the Task Scheduler wasn’t working. After adding a password to my account, it worked flawlessly.
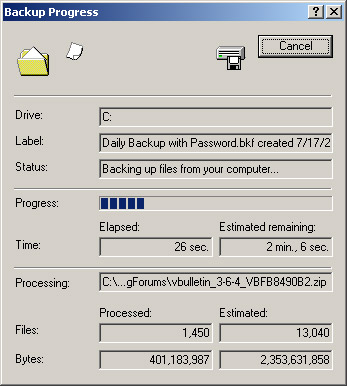
If you run NTBACKUP without the Task Scheduler or run it manually, you’ll see the following screen. To backup around 2 GB of data, it took around a minute-and-a-half. But again, if you run it with the scheduler, this will be done in the background and you won’t notice anything occuring.
The one thing that the Windows Task Scheduler is lacking is the ability to set retention periods – I guess this is because the Scheduler is really meant to schedule any exectuable file, and not just backups. You therefore have only two choices: to append the backup data, or to write over it each time. I chose the latter because I don’t want to have to keep an eye on the size of my HD constantly. That would be too much of a pain and somewhat against the whole point of automating the process.
Fortunately, I have two solutions for you. The first is to download and use Enhanced Windows Backup v1.1. It’s completely freeware and is an addon to NTBACKUP. It’s main advantage, in my opinion, is that it lets you set retention periods (remove old backups before your backup device gets full). I opted not to go this route as I wanted to make my backup system as basic as possible, and using another piece of software only convolutes things.
The second solution is to simply add extra tasks to run your backup within the Task Scheduler. So, you could three tasks: one running daily, one running weekly, and one running monthly. You’d then always be able to choose from which backup to restore from – yesterday, last week, or last month. This is useful if you require restoring a file or files that you didn’t deleted a couple weeks ago and didn’t realize you’d need later.
If you’re smart, you can even have make a 7-day retention backup system… here’s a hint: use the ‘every x days’ feature 😉
So now I have a great backup solution all set up. Whenever I turn my computer on, I have a backup made onto my second Hard Drive. If my main hard drive ever breaks again and the data isn’t recoverable, after a reinstallation of Windows, I can restore my data in a couple of minutes. Or, if I accidently delete a file or break a PHP script while working, I can restore the file in just a few seconds. The best part is that it’s all done in the background, and it’s all automatic.
Enjoy 🙂


Tyler,
Just buy a USD HD next time so you don’t need to worry about installing it. 😉
Tyler, you got ripped off on that hard drive. You paid $1/GB for a slow IDE drive when you could have gotten a Seagate SATA, 300GB-500GB hard drive online for $0.20-$0.25/GB. I would try to get a refund if I were you 😉
Oh, but I hate waiting 😉 And shipping isn’t cheap, especially if it’s shipping from the US.
Hmm. I like the idea of burning to a CD more than this. Mostly because this isn’t the best way to minimize your risk. What happens if lightning zaps your computer? Both hard drives are gone.
That’s why storing off-site is ultra safe and burning a disc is good, too. Personally, I can’t point any fingrers because I do a poor job at backing anything up and don’t have any system in place so…
1) you’re ahead of me
2) different winds float different boats
I actually have a very expensive surge power protector which should protect my computer from any lightning strike, and I do plan on making my DVD backups every 5 weeks or so still.. but now I have daily backups as well which is great.
It’s just impossible to backup onto DVD every day… it’s annoying enough doing it once a month as it is..
If you want a real backup solution I suggest SmartSync Pro.
It allows you to backup to another hard drive, ftp account, network drive, or even e-mail yourself zip pieces of the backup. It can do all files, incremental, etc.
You can schedule more than 1 backup/type/location.
I backup only selected files/folders/emails to my external USB HD, and then mirror that USB HD to another external HD for safety. THis way when I travel or go on vacationI take the drive with me as “backup” in case something happens when I’m gone.
I plan to setup FTP backup in the future in case of localized fire, etc. I do DVD backups rarely for offsite.
-Todd
Yes, there are a lot backup software/solutions out there, but I like to keep things as simple as possible and this does the basics of backing up for me, and is completely free and ships with Windows.
SmartSync Pro costs money, although it is very affordable at $35 a license.
We often underestimate the value of the scheduling program in Windows… I don’t think I’ve used it more than once since I found it in Windows 98SE… nearly 10 years ago.
Always one OS behind!
Kenneth
Howdy! I arrived at your blog via this post and I liked it enough to subscribe to your feed. Thanks for the helpful information!